Libbitcoin: Interactive HD Keychain Part 2/2

HD Keychain.

Now that I’ve created my keychain object I just need to write a command line interface for the user to interact with the class. To do this I’ll need to start with a separate file and in that file I’m going to use my usual includes and namespace but with the addition of the file that contains the HD wallet class I’ve just created.

	#include <bitcoin/bitcoin.hpp>
	#include <string.h>
	#include <iostream>
	#include "HD_Wallet.cpp"

	using namespace bc;

Now, for this program I’m going to want a main menu and a sub-menu for the display options.


void mainMenu()
{
	std::cout << "\n==========================" << std::endl;
	std::cout << "1. Generate New Wallet" << std::endl;
	std::cout << "2. Import Wallet" << std::endl;
	std::cout << "3. display" << std::endl;
	std::cout << "4. Exit" << std::endl;
	std::cout << "==========================" << std::endl;
}

void displayMenu()
{
	std::cout << "\n==========================" << std::endl;
	std::cout << "1. Private Key" << std::endl;
	std::cout << "2. Mnemonic" << std::endl;
	std::cout << "3. Child Private Key" << std::endl;
	std::cout << "4. Payment Address" << std::endl;
	std::cout << "5. Address Range" << std::endl; 
	std::cout << "6. Dump Keys" << std::endl;
	std::cout << "7. Exit" << std::endl;
	std::cout << "==========================" << std::endl;
}

Once I have my menu I’m going to want to write a function to get the user’s menu selection and return it as an integer. Simple enough with the standard library.

int getInput()
{
	int choice;
	std::cout << "Enter a Number: "; 
	std::cin >> choice;
	return choice;

}

I also want the user to be able to import a wallet via it’s seed, so I’ll need a function that takes the users mnemonic and converts it to a word_list object before returning it. Note that the split function here splits a string up by each space and puts it into a word list.


wallet::word_list getWordList()
{
	std::string mnemonicSeed;
	std::cout << "Enter Seed String:";
	cin.ignore();
	std::getline(cin, mnemonicSeed);
	return split(mnemonicSeed);
}

Okay, with these helper functions done, I now need a function to initialize my HD_Wallet object from 128-bits of entropy and then return that object. For good measure I’m also going to have this function call it’s dumpKeys member and display all the newly created keys to the user.


HD_Wallet randomGen()
{
	data_chunk entropyChunk = data_chunk(16);
	pseudo_random_fill(entropyChunk);
	HD_Wallet(entropyChunk).dumpKeys();
	return HD_Wallet(entropyChunk);
}

With that done, I’m now going to write my driver function. Everything from here on is going to go in the main function.

Starting with initializing a wallet object using the randomGen() function.


int main(){
	HD_Wallet wallet = randomGen();
}

For the user interface, I’m going to use a while loop and since “option 4” maps to exit in the menu I’m going to have it loop as long as choice does not equal 4. To get this loop started I’m going set the choice variable to 0 and immediately inside the while loop call the main menu function and setting the choice variable to whatever gets return by the get input function.


int choice = 0;
	while(choice != 4)
	{
		mainMenu();
		choice = getInput();
	}

From there, I just fill out if statements with functions corresponding to the options in the menu.
Here I’ve filled in the options for the two types of wallet constructors.


int choice = 0;
	while(choice != 4)
	{
		mainMenu();
		choice = getInput();
		if(choice == 1)
		{	
			wallet = randomGen();
		} else if(choice == 2)
		{	
			wallet::word_list mnemonicSeedList = getWordList();
			if(wallet::validate_mnemonic(mnemonicSeedList))
			{
				wallet = HD_Wallet(mnemonicSeedList);
				wallet.dumpKeys();
			} else {
				std::cout << "Mnemonic Invalid!" << std::endl;
			}

		}

	}

Now, for the display menu I just need to replicate this while loop and simply nest it inside another if statement but instead of calling the main menu I need to call the display menu. Similarly, I need to fill out the if statements inside of this while loop with the corresponding options in the display menu.


int choice = 0;
	while(choice != 4)
	{
		mainMenu();
		choice = getInput();
		if(choice == 1)
		{	
			wallet = randomGen();
		} else if(choice == 2)
		{	
			wallet::word_list mnemonicSeedList = getWordList();
			if(wallet::validate_mnemonic(mnemonicSeedList))
			{
				wallet = HD_Wallet(mnemonicSeedList);
				wallet.dumpKeys();
			} else {
				std::cout << "Mnemonic Invalid!" << std::endl;
			}

		}

	}else if (choice == 3)
		{	
			while(choice != 7){
				displayMenu();
				choice = getInput();
				std::cin.ignore();
				int index;
				
				if(choice == 1)
				{
					wallet.displayPrivateKey();
				} else if(choice == 2) 
				{
					wallet.displayMnemonic();

				} else if (choice == 3)
				{
					index = getInput();
					wallet.displayChildPrivateKey(index);

				} else if (choice == 4)
				{
					index = getInput();
					wallet.displayAddress(index);
				} else if (choice == 5)
				{
					int start = getInput();
					int end = getInput();
					wallet.addressRange(start, end);
				}else if (choice == 6)
				{
					wallet.dumpKeys();
				}else if (choice == 7)
				{
					std::cout << "Bye" << std::endl;
				} else
				{
					std::cout << "Selection Invalid! " << std::endl;
				}
			}
		}
	}

Now I just need to add a goodbye message and an invalid input catcher to the main while loop and the program is ready to go. The complete main function should look like this:


int main(){
	HD_Wallet wallet = randomGen();
	int choice = 0;
	while(choice != 4)
	{
		mainMenu();
		choice = getInput();
		if(choice == 1)
		{	
			wallet = randomGen();
		} else if(choice == 2)
		{	
			wallet::word_list mnemonicSeedList = getWordList();
			if(wallet::validate_mnemonic(mnemonicSeedList))
			{
				wallet = HD_Wallet(mnemonicSeedList);
				wallet.dumpKeys();
			} else {
				std::cout << "Mnemonic Invalid!" << std::endl;
			}

		} else if (choice == 3)
		{	
			while(choice != 7){
				displayMenu();
				choice = getInput();
				std::cin.ignore();
				int index;
				
				if(choice == 1)
				{
					wallet.displayPrivateKey();
				} else if(choice == 2) 
				{
					wallet.displayMnemonic();

				} else if (choice == 3)
				{
					index = getInput();
					wallet.displayChildPrivateKey(index);

				} else if (choice == 4)
				{
					index = getInput();
					wallet.displayAddress(index);
				} else if (choice == 5)
				{
					int start = getInput();
					int end = getInput();
					wallet.addressRange(start, end);
				}else if (choice == 6)
				{
					wallet.dumpKeys();
				}else if (choice == 7)
				{
					std::cout << "Bye" << std::endl;
				} else
				{
					std::cout << "Selection Invalid! " << std::endl;
				}
			}
		} else if (choice == 4)
		{
			std::cout << "Goodbye" << std::endl;
		}else {
			std::cout << "Selection Invalid!" << std::endl;
		}
	}
}

The entire program can be found at https://github.com/AaronJaramillo/LibbitcoinTutorial

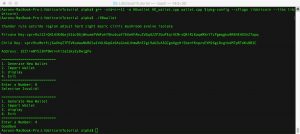
The program can now be compile as usual, though this time passing both files to the compiler, with:


$ g++ -std=c++11 -o HDwallet HD_wallet.cpp wallet.cpp $(pkg-config --cflags libbitcoin --libs libbitcoin)

$ ./HDwallet

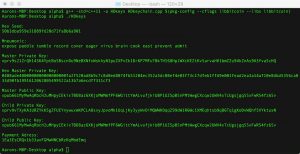
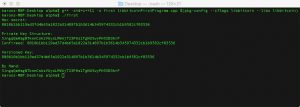
And the initial output should look something like this:

HDKeychain_Menu


Libbitcoin: Interactive HD Keychain Part 1/2

HD Keychain.

So, now that we’ve looked into how HD keys are used, I’ve decided to put together a proper HD keychain program that will allow a user to manage Hierarchical Deterministic keys from the command line.

The program I build is going to have the following features:

• Allow the user to generate a new wallet from entropy
• Allow the user to import a wallet from its mnemonic seed
• Allow the user to display:

o The mnemonic
o The master private key
o Its children’s private keys
o a child Address
o a range of child addresses
o All keys at once

This program is not going to support building and signing transactions and it won’t be connected to the blockchain and therefore will not be able to check balances. Thus, this program is technically a keychain rather than a wallet.

So, to implement this wallet I am going to create an HD_Wallet class to hold all the functionality and in a separate driver file I will have functions that handle interfacing with the user.

To start I am going to fire up sublime, create a file named HD_Wallet.cpp and include my necessary headers.

	#include <bitcoin/bitcoin.hpp>
	#include <string.h>
	#include <iostream>

	using namespace bc;

After, I’m going to create a class called HD_Wallet and declare 2 constructor functions, one to create an object from entropy and another to create an object from a mnemonic seed. Additionally, I’m going to need to declare variables for the necessary keys as private members of the class. So, my class skeleton is going to look like this.


class HD_Wallet
{
public:

	//constructor
	HD_Wallet(const data_chunk Userentropy)
	{
		
	}

	HD_Wallet(const wallet::word_list mnemonicSeed)
	{

	}
private:
	//members
	data_chunk entropy;
	data_chunk seed;
	wallet::word_list mnemonic;
	wallet::hd_private privateKey;
	wallet::hd_public publicKey;


};

Now that I have the basics of this object I need to fill out the constructor function, starting with the constructor from entropy. First I’m going to take the entropy argument, which should be 16 byte (64-bit) datachunk, and store it in the classes entropy member. Next, I need to set the mnemonic member by using libbitcoin’s create_mnemonic function and passing it the entropy variable. Once I have the mnemonic, I can create the wallets seed by using the decode_mnemonic function and storing the returned hash in the seed variable. From there, I just need to set the master private key and public key using the libbitcoin objects we saw in my previous post.

Here’s how my first constructor looks:


HD_Wallet(const data_chunk Userentropy)
{
	entropy = Userentropy;
	mnemonic = wallet::create_mnemonic(entropy);
	seed = to_chunk(wallet::decode_mnemonic(mnemonic));		
    privateKey = wallet::hd_private(seed);
	publicKey = privateKey.to_public();
}

Mnemonics

Mnemonics are a human readable way to represent a wallets seed. Our HD wallet is created by using a pseudo-random number generator to create 64 bits of random data which is then hashed using a specialized HMAC512 function which is then used as the seed for creating the private/public key pair.

The encode_mnemonics function in the libbitcoin framework takes the 128 bits of entropy and, using a specialized word list, encodes it as a series of words, where every 3 words represents 32 bits of data. Our 128 bits of data is then represented by 12 words which the user can write down and store somewhere physically.

The decode_mnemonics function then takes a mnemonic as an argument and returns it’s hashed 512 bit seed. Note that the decode function will not return the original 128 bits of data that was encoded to create the seed as the seed already represents this data in the form of words rather than hexadecimal encoding.

The hashed 512 bit seed can then be passed to an HD_private constructor to generate a wallet’s private key.

Thus, in order to make my mnemonic constructor function for importing a wallet we are going to need to pass a mnemonic word_list as an argument to the function. From there I need to use the decode function to get the hashed seed and cast that seed as a data chunk type before storing it in the seed variable. Once I have the seed, I can just save the mnemonic in the proper variable and use the private / public key constructors with the data_chunk seed. The import wallet constructor should look like this.


HD_Wallet(const wallet::word_list mnemonicSeed)
{
	seed = to_chunk(wallet::decode_mnemonic(mnemonicSeed));
	mnemonic = mnemonicSeed;
	privateKey = wallet::hd_private(seed);
	publicKey = privateKey.to_public();


}

Child Keys

Now that I’ve built the constructor functions I am going to need to make the accessor functions in order to allow my user to access child keys and addresses of the wallet. In order to do this I simply need to use the member functions of the libbitcoin objects I went over in my previous post. Notice that I allow the user to pass the index of the desired child key pair they want. Here’s how my accessors ended up looking:


	wallet::hd_private childPrivateKey(int index)
	{
		return privateKey.derive_private(index);
	}

	wallet::hd_public childPublicKey(int index)
	{
		return publicKey.derive_public(index);
	}

	wallet::payment_address childAddress(int index)
	{
		return wallet::ec_public(childPublicKey(index).point()).to_payment_address();
	}

Display

Now I’m going to create the display functions to output the keys. Since the accessor functions I wrote return libbitcoin’s specialized objects, I can easily access a string encoded version of the key by accessing the serializer functions through the accessor in my custom class. For the child keys, I also pass an index variable and create a separate function to display a range of child addresses by creating a loop to call the display function with different indices.

Here’s how my display functions look:

	void displayPrivateKey()
	{
		std::cout << "\nPrivate Key:" << privateKey.encoded() << std::endl;
	}

	void displayChildPrivateKey(int index)
	{
		std::cout << "\nChild Key: " << childPrivateKey(index).encoded() << std::endl;
	}

	void displayAddress(int index)
	{
		std::cout << "\nAddress: " << childAddress(index).encoded() << std::endl;
	}

	void addressRange(int start, int end)
	{
		while(start != end)
		{
			displayAddress(start);
			start++;
		}
	}

Finally, I just need to add a function to display the mnemonic seed. To do this, I’m going to first use and if statement to validate the mnemonic and then cast the word_list variable as a string using the join function. From there I can just use the standard cout function to display it.


	void displayMnemonic()
	{
		if(wallet::validate_mnemonic(mnemonic))
		{
			std::string mnemonicString = join(mnemonic);
			std::cout << "\n" << mnemonicString << std::endl;

		}else{
			std::cout << "mnemonic invalid!" << std::endl;
		}
	}

Now that I have all the display functions I can create a function to display all the keys by simply calling all of the functions I’ve just created, like so:


void dumpKeys()
{
	displayMnemonic();
	displayPrivateKey();
	displayChildPrivateKey(1);
	displayAddress(1);

}

With that, I’ve created my entire HD wallet keychain class. In part 2 of this post I will be creating the command line interface to use this object. As always the full code to this tutorial can be found at https://github.com/AaronJaramillo/LibbitcoinTutorial

Libbitcoin: HD Keys

Modern Wallets use Hierarchical Deterministic(HD) Keys rather than simple keys in order to allow a user to use a different bitcoin address with every transaction.

Today, We’re going to program an HD keychain that generates all the necessary keys for a bitcoin wallet. This is going to allow us to see how all the special data structures are used to represent keys in libbitcoin.

HD keys are comprised of a Master Key, a Chain code, and an index all of which are used to derive child public/private keys and thereby generating unlinkable bitcoin addresses which are all cryptographically usable by the same master key. This allows the user to create a custom and complex wallet structure involving different addresses for different purposes and spendable with only with certain keys while maintain a central point of control with the master key. For example, a certain set of keys might be used as a change addresses while others are used for receiving customer funds. Additionally, certain private keys can be used as employee expense accounts by limiting access to a certain set of funds.

Our program is going to be a simple HD keychain generator which generates a brand new set of HD keys from entropy and displays all of it’s elements including a mnemonic designed to be a more human readable form of the seed to be stored.

Start out by including the necessary libraries and namespaceing libbitcoin.

#include <bitcoin/bitcoin.hpp>
#include <string.h>
#include <iostream>


using namespace bc;

Now, in our main function we are going to need to create a seed using the pseudo-randomness generator. This seed is going to be hashed into out private key so the more random the more secure it will be. For this we first need to declare a data chunk variable and declare it’s size since libbitcoin’s randomness function allows us fill it directly. Since a data chunk is a vector of bytes(8 bit structures) we are going to declare 16 bytes which allows us enough room for a 128 bit seed, the standard for a “short seed”. Then we simply call the utility function for pseudo random fill on the chunk and then call the encode base16 function on it to print it in hex format to the console.

	data_chunk seedChunk(16);
	pseudo_random_fill(seedChunk);
	std::cout << "\nHex Seed: " << std::endl;
	std::cout << encode_base16(seedChunk)<< std::endl;

Once we have the seed we need to generate a mnemonic in order to make it easier to write down. To do so we declare a “word_list” type variable and store the return result of our “create_mnemonic” function in it. Here, again, we need to remember to scope the wallet namespace.

Please Note: This mnemonic will not be able to retrieve the seed within the libbitcoin framework. Since we are using a simple seed to generate the private keys rather than hashing. The libbitcoin function to decode these mnemonics rely on hashed seeds. I will explain this in depth in my following post.

wallet::word_list writtenWord = wallet::create_mnemonic(seedChunk);
Now we use the validator function to make sure it worked and print out the mnemonic by iterating over the word list.
 
if(wallet::validate_mnemonic(writtenWord)){ for (auto i = writtenWord.begin(); i != writtenWord.end(); ++i) 
std::cout << *i << ' '; 
}else{ std::cout << "mnemonic invalid!" << std::endl; } 

Once we have the seed, we just need to insatiate the keys using the special libbitcoin objects in the same way describe in my previous post except that now we will specify the type as HD.

For the private keys take note of the member functions used to display the keys. Calling the serializer function “encoded()” displays the base58check(WIF) format of the key while calling “to_hd_key()” returns the raw byte array which can be encoded using hex for display:

	wallet::hd_private privateKey(seedChunk);
	std::cout << "\n\nMaster Private Key: " << std::endl;
	std::cout << privateKey.encoded() << std::endl;

	wallet::hd_key keys = privateKey.to_hd_key();
	std::cout << "\nHex Master Private Key: " << std::endl;
	std::cout << encode_base16(keys) << std::endl;

Next, using the master private key object’s factories we can derive the public key easily.

	wallet::hd_public publicKey = privateKey.to_public();
	std::cout << "\nMaster Public Key: " << std::endl;
	std::cout << publicKey.encoded() << std::endl;

Now that we have generated the master keys, deriving the child keys is once again relatively simple using the private key’s factory methods. Although, it is important to notice that we are passing an index as an argument to the “derive_private” method. The index is useful for keeping track of the structure of your wallet, for example, keys derived from index 1 – 5 are used as receiving addresses while 6-9 are used for chain address.

	wallet::hd_private childPrivateKey = privateKey.derive_private(1);
	std::cout << "\nChild Private Key: " << std::endl;
	std::cout << childPrivateKey.encoded() << std::endl;

Same goes for the public key.

	wallet::hd_public childPublicKey = privateKey.derive_public(1);
	std::cout << "\nChild Public Key: " << std::endl;
	std::cout << publicKey.encoded() << std::endl;

Finally, we can display a payment address spendable by our master key but not obviously associated with it.

To do this we use the child public keys accessor function “point()”, which returns an elliptic curve public key point that we will use to instantiate an “ec_public” object. Once we have the public key object we will use its factory method “to_payment_address()” and then call the returned address’s serializer function “encoded()” to print it out.

Although, this encoding can be done separately I have shown it as a one liner for the sake of style points.

	std::cout << "\nPayment Adress: " << std::endl;
	std::cout << wallet::ec_public(childPublicKey.point()).to_payment_address().encoded()<< "\n" << std::endl;

Then, just compile as usual and the output should look like this.

HDkeys output

Next, we will be looking at how to persistently manage these keys in a wallet-like environment rather than just generating them.

Libbitcoin: First Program

Working with Private Keys

This example program will walk through converting bitcoin private keys with libbitcoin and will help you get an understanding of how the library is used.

If you don’t already have libbitcoin installed follow my tutorial here.

Our starter program is going to take a 256-bit secret key and convert it to a bitcoin private key in wallet import format. I will go over how the libbitcoin API works as well as how this conversion works on a conceptual level.

Bitcoin Private Keys Explained

Private Keys in Libbitcoin

How It Works

How to Compile with Libbitcoin

Private Keys

Bitcoin private keys are 256-bit hashes generally expressed in wallet import format(WIF) as a base58 checksum encoded number. What does that mean? Basically, a private key is just some sequence of 256 1’s and 0’s which is then encoded into a format that’s easier to read.

Generally, a random number generator is used to produce a seed from entropy which is then hashed using the SHA256 hashing function which returns our coveted 256-bit number. This product of the hashing function is our valuable password(secret key) on the bitcoin network so it is to be protected and kept secret.

This secret key is then encoded to make it easier to read and transfer between wallet software. Secret keys are generally encoded with certain metadata, such as key type, version info and its checksum, resulting in wallet import format. WIF is structured like so:

Version Prefix + Secret Key + Key Type + Checksum

Where, the version prefix for private keys is 128(0x80 in hex) the secret key is the secret key, the key type is 01 if it is a compressed key or not included if it is an uncompressed key. The checksum is the result of a double SHA256 performed on all the previous parts of the key. The first 4 bytes of this hash are then concatenated to the end of the key and the entire thing is base58 encoded.

Base58 encoding is common encoding used with bitcoin and is similar to an encoding like base16(hex) or base64 it is simply optimized to be easier to read by eliminating ambiguous characters such as I(capital i) and l(lowercase L). This is the same format used for bitcoin addresses.

The checksum is used to ensure that no mistakes have been made in the transcription of any of the characters as wallet software will check that the 4-byte hash matches the hash of the rest of the data thus preventing a costly typo based mistake.

The resulting WIF private key can easily be encoded into a QR code for easy transfer.

How to convert a secret key to WIF in Libbitcoin

Now, the fun part. Fire up your text editor and add your includes.


#include <bitcoin/bitcoin.hpp>
#include <string.h>
#include <iostream>

The libbitcoin library is included as bitcoin/bitcoin.hpp. After that we’re going to have to use the libbitcoin namespace as shown below. This is because libbitcoin has multiple sub namespaces to accommodate the ambiguity introduced by a lot of the custom types used.


using namespace bc;

Now, inside our main function we are going to declare our hexadecimal secret key as a string and print it out. In order to create this key we will first need to generate it using a pseudo random number generator.

We’re going to work with a general libbitcoin type called a data_chunk which is just a vector of bytes, specifically a vector of unsigned 8 bit integers. Data chunks are used to represent all kinds of raw data in the libbitcoin toolkit.

For our seed we will first need to declare a data_chunk vector of 16-bytes, this will be used as a buffer which we will fill with entropy using the pseudo_random_fill function. After that, we can declare an ec_secret object. Remember a secret key is distinct from a private key; where, secret key refers to the 256-bit value and private key refers to the secret key plus all its metadata(WIF).

We can create the secret key by sha256 hashing the seed twice, both hashes can be accomplished by using the bitcoin_hash_function

data_chunk seed(16);
pseudo_random_fill(seed);
ec_secret secretKey = bitcoin_hash(seed);

Then, we can use the handy encode_base16 function to encode the vector of raw bytes, AKA our secret_key object, into a base16 formatted string.(Note: these encode/decode function are available for many types including base58, and base64)


std::string hexKey = encode_base16(secretKey);
std::cout << "Hex secret: " << std::endl;
std::cout << hexKey << std::endl;

Now, to convert the secret key using the libbitcoin API we’re going to use the following code:


	ec_secret rawprivateKey;
	decode_base16(rawprivateKey, hexKey);
	wallet::ec_private privateKey(rawprivateKey, 0x8000, false);
	std::cout << "\nPrivate Key Structure: " << std::endl;
	std::cout << privateKey.encoded() << std::endl;
	ec_secret keyTest = privateKey.secret();
	std::string keyTestString = encode_base16(keyTest);
	if(keyTestString == hexKey){
		std::cout << "Confirmed: " <<keyTestString << std::endl;
	} else {
		std::cout << "Error!" <<keyTestString << std::endl;
	}

The first line here declares a special libbitcoin type ec_secret, which is a special byte array type used for private keys. The next line uses the decode_base16 function to convert our hexKey string from base16 and save it into our ec_secret type variable. The decode_base16 function takes arguments for the output byte array and the input string and returns a bool(true/false) if it worked properly.

	ec_secret rawprivateKey;
	decode_base16(rawprivateKey, hexKey);

Next, we instantiate a libbitcoin private key object by first scoping the namespace wallet and then passing the following arguments to the constructor function: the raw byte array of the secret key, the key version code for a mainnet WIF, 0x8000, and since we want an uncompressed WIF we pass “false” to the compression argument.

wallet::ec_private privateKey(rawprivateKey, 0x8000, false);

Now that we have our private key object, we can print it out using its string serializer function encoded().

	std::cout << "\nPrivate Key Structure: " << std::endl;
	std::cout << privateKey.encoded() << std::endl;

After, we can check that our WIF private key did in fact originate from our initial hex key by using the secret() accessor function and the encode_base16 function to output the the private key in hex form and check that against the original hexKey.

ec_secret keyTest = privateKey.secret();
	std::string keyTestString = encode_base16(keyTest);
	if(keyTestString == hexKey){
		std::cout << "Confirmed: " << keyTestString << std::endl;
	} else {
		std::cout << "Error!" << keyTestString << std::endl;
	}

How It Works

Now that we have seen how to convert private keys using the special libbitcoin data structures, we can walk through how the keys are actually formatted by manually using some of libbitcoin’s helper functions.

We’ll start by adding 80, the hex version prefix, to the front of the secret key’s hex string and print that out for reference.


	hexKey = "80" + hexKey;
	std::cout << "\nVersioned Key: " << std::endl;
	std::cout << hexKey << std::endl;

So, we define 2 variables of this type to store the raw secret key and the WIF key. Additionally, we need to declare a byte array in order to hash the checksum. The size declared here is for an uncompressed WIF.


	data_chunk fullKey;
	data_chunk wifVersion;
	byte_array<37u> versionedKey;

Once we have our memory allocated, we can use some of the encoding functions we’ve already seen to convert the necessary parts of the key. First, we decode the hex secret key and save the raw bytes into our data chunk variable. Next, we do the same decoding with “0x80”, the hex version prefix, and save that into a data chunk.

After we have the parts of our key converted we need to add the checksum to the end. This is easily accomplished with a libbitcoin helper function which takes the destination byte array and an aggregator of the prefix and secret key as arguments in that order.


	decode_base16(fullKey, hexKey);
	decode_base16(wifVersion, "0x80");
	build_checked_array(versionedKey, { wifVersion, fullKey});

After the build_checked_array function executes, we have our full key with it’s prefix and checksum saved into our byte array. This leaves us with just one more step: to encode the key into a bitcoin readable format, base58.


	std::string practiceKey = encode_base58(versionedKey);
	std::cout<< "\nBy Hand:" << std::endl;
	std::cout<< practiceKey << std::endl;

The output here is the wallet import format for an uncompressed private key.

How to Compile and Run a Libbitcoin Program

In order to run a program with libbitcoin we are going to need to compile our program to link the libbitcoin library and specify standard c++11 syntax using g++.

$ g++ -std=c++11 -o first libbitcoinFirstProgram.cpp $(pkg-config --cflags libbitcoin --libs libbitcoin)

after that we can run it like most c++ programs.

	$./first

The output should look similar to this:

libbitcoinfirstoutputjpg

This program converts into an uncompressed WIF which is a rarely used format type. For extra practice, go ahead and reimplement this program for compressed keys which simply require the suffix “01” added to the end of the hex secret key.

Getting Started with Libbitcoin

Libbitcoin is a system’s level C++ toolkit for programming with the Bitcoin Blockchain. It’s a highly modular framework and with a little practice it can be a great tool to implement privacy and security focused bitcoin features. In this multi-part series I’ll be going over some of the basics of the library.

First step is installation; I’ll be going over installation for Mac.

On Mac OSX, clang version >7 is required so go ahead and check it with:


$clang++ --version

After that you need to have the xcode toolchain installed. Easy enough with:

$ xcode-select --install

Next, you’ll need to use homebrew to install some of libbitcoin’s dependency stack with:

$ brew install autoconf automake libtool pkgconfig wget
$ brew install boost

After you have all the dependencies installed on your system you go ahead and clone the repo into a local directory:


$ git clone https://github.com/libbitcoin/libbitcoin.git

then checkout the latest version tag with git:

$ git checkout tags/v3.6.0 

and walk through the make file with autotools:


$ ./autogen.sh
$ ./configure
$ make
$ sudo make install