Libbitcoin enables developers to make high level calls to the bitcoin p2p network, allowing them to work with data queried from the blockchain.
In order to call blockchain data, a libbitcoin-server needs to be queried using libbitcoin’s networking API which is exposed in the libbitcoin-client library. Click here to learn how to install libbitcoin-client.
There are two core parts to making a call to a libbitcoin-server. First, an obelisk client object is instantiated to set the parameters of the connection we want to make to a server. Second, libbitcoin is an asynchronous toolkit which avoids blocking other functions when using a worker or making an api call. Therefore, the use of callback function handlers is necessary when making a query.
So, firstly I’ve created a file called helloBlockchain.cpp and included the necessary libraries as well as namespace.
#include <bitcoin/bitcoin.hpp>
#include <bitcoin/client.hpp>
#include <string.h>
#include <iostream>
#include <cstdint>

using namespace bc;
Next, inside the main function, a connection_type object can be used to set all the parameters of the connection. Including variables such as: retry attempts, timeout time and the server endpoint.
int main()
{
 client::connection_type connection = {};
 connection.retries = 3;
 connection.timeout_seconds = 8;
 connection.server = config::endpoint("tcp://mainnet.libbitcoin.net:9091");
}
Now, also in the main function, we are going to need to create the call back functions. We’ll need one for the completion of the call and one if the call returns an error. For both, we are going to simply print out the returned error code or block height.
const auto on_reply = [](size_t blockHeight)
{
std::cout << "Height: " &lt;&lt; blockHeight << std::endl;
};
static const auto on_error = [](const code& ec)
{
std::cout << "Error Code: " << ec.message() << std::endl;
};
Finally, now that everything is set up we can connect to the network and query the current block height of the network. We just need to pass our connection struct to a obelisk_client object and then use its connect function to establish a connection with the server. Note, that by nesting this call in an if-statement we create a nice little error catching message printed to the console.
 client::obelisk_client client(connection);

 if(!client.connect(connection))
 {
 std::cout << "Fail" << std::endl;
 } else {
 std::cout << "Connection Succeeded" << std::endl;
 }
Once the connection is established, we can simply use the client’s fetch height function and then immediately use its wait function to keep the app running while the asynchronous functions resolve. Like so:
 client.blockchain_fetch_last_height(on_error, on_reply);
 client.wait();

}
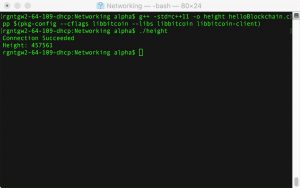
With that, this program can be compiled and run similarly to the other programs with the exception that libbitcoin-client must be passed as a lib to the command line compiler.
alpha$ g++ -std=c++11 -o height helloBlockchain.cpp $(pkg-config --cflags libbitcoin --libs libbitcoin libbitcoin-client)
alpha$ ./height
The output should look similar to this, displaying the current block height or an error code, and whether or not the connection succeeded.
Note, that this can be used to call the testnet by simply passing the libbitcoin server “tcp://testnet.libbitcoin.net:9091” to the connection struct.
As always, full sample code can be found on github under the networking directory.
Hello, thanks you of thiese well writen tutorials on libbitcoin.
Do we need to install libbitcoin server ? I have not seen it anywhere !
I have libbitcoin core, client, protocole.
Hello!
You do not need libbitcoin-server unless you want to run a server. For this tutorial you can use libbitcoin-client to send requests to and get information from a publicly available libbitcoin server.
Thank you. So libbitcoin server. is the lib that allows us run a full node ?