Libbitcoin: Checking an Address’ Balance

Querying an address’ balance with libbitcoin-client is a rather straight forward process. If you haven’t already installed libbitcoin-client, click here to learn how.

Now, to check an address balance we’ll need a function to make calls to a libbitcoin-server(BS), a function to parse the outputs into a balance and the main function to set the address to check.

I’ve created a file called Balance.cpp and included the usual headers and namespaces.

#include <bitcoin/bitcoin.hpp>
#include <bitcoin/client.hpp>
#include <string.h>
#include <iostream>
using namespace bc;

Now, the function to call the server is very similar to the tutorial on how to fetch the current blockchain height, making use of the connection struct to set the connection settings before instantiating an obelisk_client object with those settings.

void getBalance(wallet::payment_address address)
{
 client::connection_type connection = {};
 connection.retries = 3;
 connection.timeout_seconds = 8;
 connection.server = config::endpoint("tcp://mainnet.libbitcoin.net:9091");

 client::obelisk_client client(connection);

Now, for this call two callback handlers are necessary on for the response and one for the error. The on_error handler will simply display the error message returned by the server. The response handler is going to return chain::history::list object of all the outputs associated with the address both spent and unspent, thus the need for a separate parsing function. In our handler were just going to pass the history object to a different function and display the balance that is returned. Again, note the use of libbitcoin’s encode_base10 function for placing the decimal in a uint64_t number.


static const auto on_done = [](const chain::history::list& rows)
 {
      uint64_t balance = balancer(rows);
      std::cout << encode_base10(balance, 8) << std::endl;

 };
 static const auto on_error2 = [](const code ec) {

      std::cout << "Error Code: " << ec.message() << std::endl;

 };

Finally, to finish off the BS call, we simply connect the client to the server and use the fetch history function passing our address and handlers as arguments.


 if(!client.connect(connection))
 {
 std::cout << "Fail" << std::endl;
 } else {
 std::cout << "Connection Succeeded" << std::endl;
 }

 client.blockchain_fetch_history2(on_error2, on_done, address);
 client.wait();

Now, the function to parse this history is going to need to return a unsigned long long, aka uint64_t, and take a vector of chain::history objects as an argument. Then we simply iterate over the list and check if each output has a spend that is a null_hash as this indicates an unspent output. Aggregate these unspent outputs into one balance variable and return it to the callback function. Like so:


uint64_t balancer(const chain::history::list& rows)
{
 uint64_t unspent_balance = 0;

 for(const auto& row: rows)
 {

 // spend unconfirmed (or no spend attempted)
 if (row.spend.hash() == null_hash)
 unspent_balance += row.value;
 }
 return unspent_balance;
}

With that, all we need to do is set the address in the main function and call our getBalance function.


int main()
{

 wallet::payment_address addy("3MYPG87AYvyGrDyBHnUFsgqWGJ6zkfmsqu");
 getBalance(addy);


}

recommended compilation method is as follows:


alpha$ g++ -std=c++11 -o balance Balance.cpp $(pkg-config --cflags libbitcoin --libs libbitcoin libbitcoin-client)
alpha$ ./balance

The output should look like this:

Balance

For the full sample code for all tutorials, please visit the LibbitcoinTutorials repo on github.


Libbitcoin: Connecting to the Network

Libbitcoin enables developers to make high level calls to the bitcoin p2p network, allowing them to work with data queried from the blockchain.

In order to call blockchain data, a libbitcoin-server needs to be queried using libbitcoin’s networking API which is exposed in the libbitcoin-client library. Click here to learn how to install libbitcoin-client.

There are two core parts to making a call to a libbitcoin-server. First, an obelisk client object is instantiated to set the parameters of the connection we want to make to a server. Second, libbitcoin is an asynchronous toolkit which avoids blocking other functions when using a worker or making an api call. Therefore, the use of callback function handlers is necessary when making a query.

So, firstly I’ve created a file called helloBlockchain.cpp and included the necessary libraries as well as namespace.

#include <bitcoin/bitcoin.hpp>
#include <bitcoin/client.hpp>
#include <string.h>
#include <iostream>
#include <cstdint>

using namespace bc;

Next, inside the main function, a connection_type object can be used to set all the parameters of the connection. Including variables such as: retry attempts, timeout time and the server endpoint.

int main()
{
 client::connection_type connection = {};
 connection.retries = 3;
 connection.timeout_seconds = 8;
 connection.server = config::endpoint("tcp://mainnet.libbitcoin.net:9091");
}

Now, also in the main function, we are going to need to create the call back functions. We’ll need one for the completion of the call and one if the call returns an error. For both, we are going to simply print out the returned error code or block height.

 const auto on_reply = [](size_t blockHeight) 
 {
 std::cout << "Height: " &amp;lt;&amp;lt; blockHeight << std::endl;

 };

 static const auto on_error = [](const code& ec) 
 {

 std::cout << "Error Code: " << ec.message() << std::endl;

 };

Finally, now that everything is set up we can connect to the network and query the current block height of the network. We just need to pass our connection struct to a obelisk_client object and then use its connect function to establish a connection with the server. Note, that by nesting this call in an if-statement we create a nice little error catching message printed to the console.

 client::obelisk_client client(connection);

 if(!client.connect(connection))
 {
 std::cout << "Fail" << std::endl;
 } else {
 std::cout << "Connection Succeeded" << std::endl;
 }

Once the connection is established, we can simply use the client’s fetch height function and then immediately use its wait function to keep the app running while the asynchronous functions resolve. Like so:

 client.blockchain_fetch_last_height(on_error, on_reply);
 client.wait();

}

With that, this program can be compiled and run similarly to the other programs with the exception that libbitcoin-client must be passed as a lib to the command line compiler.

alpha$ g++ -std=c++11 -o height helloBlockchain.cpp $(pkg-config --cflags libbitcoin --libs libbitcoin libbitcoin-client)
alpha$ ./height

The output should look similar to this, displaying the current block height or an error code, and whether or not the connection succeeded.

BlockHeight

Note, that this can be used to call the testnet by simply passing the libbitcoin server “tcp://testnet.libbitcoin.net:9091” to the connection struct.

As always, full sample code can be found on github under the networking directory.

Libbitcoin v3: Installing Libbitcoin-Client

In order to work with blockchain data with libbitcoin, it is necessary to install and build the Libbitcoin-Client library which exposes api calls to Libbitcoin-Servers thus enabling developers to work with data queried from the p2p network.

Installing Libbitcoin-Client is very similar to installing the core libbitcoin library, it simply requires installing one other dependency, another libbitcoin library called Libbitcoin-Protocol. Libbitcoin-Protocol is a custom query protocol for getting blockchain data from a Libbitcoin-Server, it is built on zeroMQ and provides a clean way of communicating with blockchain servers. Libbitcoin-Protocol is also a clean frontier for innovation within the libbitcoin ecosystem, enabling open source programmers to create custom query functions that increase privacy and/or security.

To install simply invoke the following commands in your working directory, similarly to how libbitcoin was installed.

alpha$ git clone https://github.com/libbitcoin/libbitcoin-protocol.git
alpha$ cd libbitcoin-protocol
alpha$ git branch --all
alpha$ git checkout remotes/origin/version3
alpha$ git checkout -b version3
alpha$ ./autogen.sh
alpha$ ./configure
alpha$ make 
alpha$ sudo make install

Once the Libbitcoin-Protocol is installed building and installing Libbitcoin-Client is, again, very similar:

alpha$ git clone https://github.com/libbitcoin/libbitcoin-client.git
alpha$ cd libbitcoin-client
alpha$ git branch --all
alpha$ git checkout remotes/origin/version3
alpha$ git checkout -b version3
alpha$ ./autogen.sh
alpha$ ./configure
alpha$ make 
alpha$ sudo make install

Once this build is completed, Libbitcoin-Client should be installed allowing the developer to create applications that use blockchain data by querying Libbitcoin-Servers in an asynchronous fashion.

Libbitcoin v3: Installing Libbitcoin

Libbitcoin offers several options for installation.

Firstly, If you would like to simply use libbitcoin’s bitcoin functionality without having to write any code you can download the signed executable binaries for some of the libbitcoin applications. These binaries require no installation and are programs simply meant to be run on your machine. Binaries exist for the libbitcoin-node, libbitcoin-server, and libbitcoin-explorer applications. The most useful, for beginners, is the libbitcoin-explorer command line utility which allows you to explore the full range of bitcoin functions from the command line. This application exposes useful commands for hashing, key generation, transaction creation and submission as well as blockchain querying for balances, height and utxo’s.

Next, Libbitcoin offers a build system in the repository libbitcoin-build. This automated build system installs the entire toolchain from a single script. This option is great for windows or linux users familiar with GSL, travis or automated build systems in general.

Finally, each individual repository can be built with autotools on linux and OSX or with an install script on most platforms. Building libraries individually is useful if you only want to use a specific module of libbitcoin without installing the entire toolchain, though all modules depend on the foundational libbitcoin library.

I will demonstrate installation and building from source of the main libbitcoin library on Mac OSX. This process can be replicated with all other libraries, simply ensure you have installed its specific dependencies before repeating this process. This method is also beneficial if you would like to stay on the bleeding edge of libbitcoin development as it allows you to install the library from a github branch other than the stable realease branch (v3.0).

First, navigate to your working directory and once inside of it, proceed to cloning the libbitcoin repository.

alpha$ git clone https://github.com/libbitcoin/libbitcoin.git

Once the repo is cloned we’re first going to want to switch branches so that we can install the version 3 code. If you would like to install the bleeding edge(and likely, unstable) version of libbitcoin simply build the library using the master branch. First, we’ll need to switch into the local libbitcoin repository with:

alpha$ cd libbitcoin
alpha$ git branch --all

This command will display all available remote working branches, to build version 3 we’ll need to check it out first, using the following commands. The second command here creates a local clone of the branch to be worked on:

alpha$ git checkout remotes/origin/version3
alpha$ git checkout -b version3

Now that we have the stable v3 source code, we can install the dependencies. On Mac OSX use:

alpha$ clang++ --version

to make sure your system has LLVM > 6.0. Additionally, OSX users will need to have the Xcode developer tools installed, which can be achieved by invoking:

alpha$ xcode-select --install

Now, in order to install libbitcoin’s other dependencies, brew will need to be used. If you don’t have Homebrew, install it with:

alpha$ ruby "$(curl -fsSL https://raw.githubusercontent.com/Homebrew/install/master/install)"

Most of the packages libbitcoin relies on can be installed with brew using a single command.

alpha$ brew install autoconf automake libtool pkgconfig wget

Next, a small wrinkle, boost version 1.57 or greater needs to be installed and the current version of boost is 1.63.0. Now, in my personal experience libbitcoin failed to build or compile on OSX, throwing many errors at boost, using the latest version. I’m unaware as to whether or not this bug is on my machine, OSX, or libbitcoin v3 in general; but in order to build libbitcoin I needed to install boost 1.59. This can be achieved in a way very similar to how the latest version of boost is installed, simply append @[1.59] to the brew command.

//alpha$ brew install boost 
alpha$ brew install boost@1.59

Now all of libbitcoin’s dependencies are installed and we are ready to build the library. Now we just need to use autotools to generate the build artifacts and configuration settings.

alpha$ ./autogen.sh
alpha$ ./configure

Once those processes are done, make is used to build the library.

alpha$ make
alpha$ sudo make install

Boom! Once complete, libbitcoin v3 should be installed on your system. You can test it out by compiling your first libbitcoin program following this tutorial.

For more libbitcoin tutorials visit aaronjaramillo.org || For more libbitcoin sample code visit Github


Libbitcoin 3

Origins

Libbitcoin was the first re-implementation of the bitcoin protocol; it was first developed by Amir Taaki and released in 2011 along with the SX command line tools and later the obelisk server architecture.

It was the first bitcoin alternative implementation to the original reference client. Libbitcoin sought to preserve the values of open software in bitcoin by creating an implementation that payed close attention to key, high-level features of the bitcoin protocol; namely: privacy, scalability and integrity.

The goal was to create a modular toolkit that allowed the bitcoin protocol to be ultra-pluggable, extendable and hackable without creating centralization by allowing specific groups of developers to hardcode preferred parameters.

Version 3 Release

It’s almost 6 years later and an almost entirely different team of developers but development chugs along and the project’s current leader, Eric Voskuil, keeps Amir’s initial vision alive as they officially release Libbitcoin: Version 3.

Libbitcoin as a toolkit, now consists of several separate libraries each abstracting a module of the bitcoin protocol. Libbitcoin contains: the foundational libbitcoin library containing bitcoin primitive types and hashing functions for keys, addresses and transactions, the libbitcoin-client, -server, -networking and -protocol libraries which implement the p2p and networking functionality, and the libbitcoin-database, -blockchain, -consensus libraries which implement a highly efficient database and expose the necessary functionality for working with the blockchain.

In addition, Libbitcoin includes three executable applications implementing core bitcoin functionality. Libbitcoin-Server acts as a full bitcoin query server for blockchain and utxo data. Libbitcoin-node is a bitcoin full node application written with libbitcoin. Lastly, Libbitcoin-explorer is a powerful set of command line utilities for working with bitcoin generally.

Libbitcoin supports many of bitcoin’s important privacy and security features including stealth-addresses, HD-keys, multi-signature and encrypted private keys. It also avoids hardcoding important parameters such as key-version prefixes and active forks, thus, writing an application that works with segregated witness, bitcoin-unlimited, bitcoinXT or an outright alt-coin is entirely up to the developer.

LIbbitcoin offers several ways to install the toolkit including signed executable binaries, a build system with autotools and compiling from source code.

Version 3 offers many improvements to the functionality and reliability of the codebase, enabling a new wave of open source programmers to create decentralized, privacy focused bitcoin/blockchain applications.

Click here to learn how to install libbitcoin, and here to learn how to use libbitcoin.

Libbitcoin: Working with Altcoins

Libbitcoin is a modular framework making it extremely adaptable to the needs of the developer. The libbitcoin maintainers go to great lengths to design a system that avoids hardcoding values and parameters into the framework. The wallet namespace classes that deal with various key types do not have hardcoded prefix and version values, allowing the developer(us) to easily use these classes for currencies other than bitcoin.

By simply passing the necessary version values to the constructor functions we can generate keys for various altcoins. First, I’ve defined a function to generate a WIF private key and a payment address, displaying both to the user. This function takes the version prefix argument as a short.

The libbitcoin ec_private constructor takes a 2 byte version argument with most significant byte being the WIF version code and the least significant byte being the address prefix. So we simply instantiate the ec_private object with the altcoins specific prefix and some entropy. We can now use these altcoin keys with libbitcoin functions as we normally would.(working with keys in libbitcoin).

void showKeys(short altcoin)
{
 data_chunk seedChunk(16);
 pseudo_random_fill(seedChunk);

 ec_secret secret = sha256_hash(seedChunk);

 wallet::ec_private privateKey(secret, altcoin);
 std::cout << "\nWIF: " << privateKey.encoded() << std::endl;
 std::cout << "Payment Address: " << privateKey.to_payment_address().encoded() << std::endl; 
}

Now that we have a function that generates altcoin keys, I’ve declared three variables as the version codes for three Altcoins. Note that these value are the hexadecimal WIF code followed by the hexadecimal address prefix. So for Litecoin, the WIF code if 0xB0 and the version prefix is 0x30 which should result in an address that begins with “L”. Simply call the key generator function and pass the altcoin value to the function.


int main()
{
 short LTC = 0xB030; //L 0xB0, 0x30
 short DOGE = 0x9E1E; //D 0x9E, 0x1E
 short DASH = 0xCC4C; //X 0xCC, 0x4C

 showKeys(LTC);
 showKeys(DOGE);
 showKeys(DASH);

}

This script can be compiled as usual, with libbitcoins library flags.

 $ g++ -std=c++11 -o altcoin AltcoinKeys.cpp $(pkg-config --cflags libbitcoin --libs libbitcoin)
$ ./altcoin

The output should look like this. Be sure to check the first letter matches the prefix for the altcoin.

Output

As usual the full code for these blog post can be found on github. To learn more about using libbitcoin with altcoins check here.

Libbitcoin: Embedd Data in the Blockchain with OP_Return

OP_RETURN

OP_RETURN is the formal way of embedding data into the blockchain. By using a special script operation, we can create an output with a value of 0 and a script that includes up to 80 bytes of arbitrary data. By using the OP_RETURN code we create an unspendable output, meaning no unlocking script will satisfy this and the network nodes can remove them from their utxo mempools. Now, these transaction’s still need to pay a fee in order for the miner’s to include them in a block, and since the size of these transactions is generally higher than a standard transaction the fee included should be higher to ensure it gets confirmed. Any data can be stored in this field of the output, including special protocol tags for digital assets, contracts and metacoins.

rawTX

In libbitcoin, creating a null data script is easy with the help of a stack factory which means we just need to create another output with a special script to add data. I’m going to append my previous rawTX program to include another output which includes some data.

For the initial output I’m going to send the value of a utxo back to myself, minus the miner fee. I’m going to do this by updating the presets in my getInput() testing function. I also went ahead and added a 7th preset field with a string of ascii characters to post on the blockchain.


//This is a testing class
//use it to pass hardcoded strings
//to the prompts by changing the string
//declarations function and passing the preset
std::string getInput(int preset)
{
 if(preset == 1)
 {
 
 return "[ YOUR MNEMONIC SEED ]"; //Mnemonic
 } else if (preset == 2)
 {
 return "1"; //Index of child key
 }else if (preset == 3)
 {

 return "n2ge1S4bLDvJKx8AGXrK5JHY2D5cReVytu"; //Destination Adress
 }else if (preset == 4)
 {
 return "1.48192700"; //Amount of Bitcoin to Spend
 } else if (preset == 5)
 {
 return "ce7f741625dfa86a50a1f18e3664e927441e27ef2f1c526e3aff8ea6c7a650fd"; //UTXO hash to spend

 }else if (preset == 6)
 {
 return "0"; //Output index of UTXO
 }else if (preset == 7) 
 {
 return "HelloWorld";
 }
}


Now, all I need to do to include the data in the transaction is add get the string and use a special made libbitcoin serializer to write the string as data. Bitcoin output’s can have up to 80 bytes of data included so we are making the data chunk 80 bytes.

For obvious reasons, namely fees, it’s usually practical to only use the amount of data you need as not to bloat the blockchain when not on the testnet.

Once we have the data_chunk and an 80 byte buffer we can create the serializer and deserializer and write the string to the data chunk. After that we can output the encoded bytes to the terminal and save the bytes in the nullData variable.


 std::string messageString = getInput(7);
 data_chunk data(80);
 auto source = make_safe_deserializer(data.begin(), data.end());
 auto sink = make_unsafe_serializer(data.begin());
 sink.write_string(messageString);

 const auto nullData = source.read_bytes(80);
 std::cout <<; "Message: " << std::endl;
 std::cout << encode_base16(nullData) << std::endl; 

Once the data is saved, we can create an output object and use a to_null_data_pattern script factory to pass the data into an OP_RETURN script. By passing that script factory and and the value 0 to the output setters, the output is finished.


 output output2 = output();
 output2.set_script(script(script().to_null_data_pattern(nullData)));
 output2.set_value(0);

With the output done, it simply needs to be pushed back on the transaction objects outputs vector.

 //build TX
 transaction tx = transaction();
 tx.inputs().push_back(input1);
 tx.outputs().push_back(output1);
 tx.outputs().push_back(output2);

This script can be compile the same as the last rawTX program and the displayed rawTX can be broadcast to the network embedding the message.

 $ g++ -std=c++11 -o rawTX rawTX.cpp $(pkg-config --cflags libbitcoin --libs libbitcoin)
$ ./rawTX

The output should look like this:

opReturn_output

Inspect your transaction on blocktrail and you can see the two script’s one sending the change back to you and the other with your encoded message.

ConfirmedTX

This hex data represents the ascii characters in your message, some block explorers, like blocktrail will convert the hex to ascii for you:

MessageDecoded

Bam! Data Embedded for all Eternity.

Libbitcoin Multi-Signature: Making a Payment

Spending from a miltisig address isn’t a super complex procedure but is prone to mistakes, so its best to practice on the test net.

This program creates a raw transaction from a testnet 2-of-3 multisig address. Creating a multisig transaction is similar to creating a standard transaction except for the signing process which will allow me to create functions out of the routines I used in my rawTX program. So I’m going to need to:

  • Build the input
    • from utxo
  • Build the the output
    • from destination address
  • Build the transaction
  • Sign The transaction
  • Build and Add The signature script to the Transaction
  • Output the raw transaction.


     #include <bitcoin/bitcoin.hpp>
     #include "HD_walletTESTNET.cpp"
     #include <string.h>

     using namespace bc;
     using namespace bc::wallet;
     using namespace bc::machine;
     using namespace bc::chain;
 

So, I’m going to need to first create a function to deal with the unspent transaction output, here I convert the string of a transaction ID to an output point at index 0. I do this by using libbitcoin’s decode hash function on the txid string and passing the hash along with the utxo’s index to an output point constructor.


     //previous output 
output_point getUTXO()
{
 hash_digest previousTX;
 decode_hash(previousTX, "");
 return output_point(previousTX, 0u);
}

Now, I can use the utxo object to create the transactions input using the libbitcoin input setters. I also nullify the transaction sequence field by passing 0xffffffff.


//input
input makeInput()
{
 input input1 = input();
 output_point utxo = getUTXO();
 input1.set_previous_output(utxo);
 input1.set_sequence(0xffffffff);
 return input1;
}

Now that I have a way to return the transactions input I need to create the output. So, I’ll use the destination address and a script stack factory to return the locking script. After that I can create the output using the script and the amount in satoshis.


//output
script makelockingScript()
{
 payment_address destination("n2ge1S4bLDvJKx8AGXrK5JHY2D5cReVytu");
 return (script().to_pay_key_hash_pattern(destination.hash()));
}
output makeOutput()
{
 uint64_t amount = 148292700;
 script lockingScript = makelockingScript();
 return output(amount, lockingScript);
}

Now I can use these functions to create my transaction by simply pushing the input and output to the transaction object’s list member.


//transaction object 
transaction makeTX()
{

 transaction tx = transaction(); 
 input input1 = makeInput();
 output output1 = makeOutput();
 tx.inputs().push_back(input1);
 tx.outputs().push_back(output1);
 return tx;
}

Once we have out transaction, we need to sign it with two out of the three wallets. In order to create the signature I’ll need to sign the transaction object and the redeem script that created the multsig wallet. The redeem script needs to be constructed in it’s original order of public keys.

I’ve used the following function to create the redeem script out of 3 public key data chunks using a stack factory.


//Redeem Script
script redeemScript(data_chunk p1, data_chunk p2, data_chunk p3)
{
 data_stack keys {p1, p2, p3};
 script multisigScript = script(script().to_pay_multisig_pattern(2, keys));
 return multisigScript;

}

Now we can sign all the parts of the transaction by passing them with an HD_Wallet object and using a script endorsement function. This function is going to assume I’m signing with the wallets first child.


//signing 
endorsement signature(data_chunk p1, data_chunk p2, data_chunk p3, transaction tx, HD_Wallet wallet1)
{
 endorsement endorsed; 
 if(script().create_endorsement(endorsed, wallet1.childPrivateKey(1).secret(), redeemScript(p1, p2, p3), tx, 0, all))
 {
 return endorsed;
 } else {
 std::cout << "Signature Failed!! " << std::endl;
 return endorsed;
 }
}

The signing function can be used for both signatures, which means I now just need to write a function that builds the final signature script and I can put it all together in the main function. Here, I build the final script out of operations passing OP_0 (because of a bug in the scripting language), the two signatures and the serialized redeem script.


script buildSigScript(endorsement endorsed1, endorsement endorsed2, data_chunk p1, data_chunk p2, data_chunk p3)
{
 script redeem = redeemScript(p1, p2, p3);

 operation::list ops = {operation(opcode(0)), operation(endorsed1), operation(endorsed2), operation(redeem.to_data(0))};

 if(script().is_sign_multisig_pattern(ops))
 {
 std::cout<< "Sign Multisig pattern: " << std::endl;
 return script(ops);
 }else{
 std::cout << "Not sign Multisig pattern: " << std::endl;
 return script(ops);
 }
}

Now I can build the entire raw transaction in the main function. Starting by importing the wallets to use by their mnemonic seeds. In reality, I wouldn’t have access to the other wallet so I’d need to have the redeem script saved and pass my signature to my co-signer. However, for this purpose I’ll just bring in all three so I can rebuild the redeem script from their public keys.


//Display


int main()
{
 std::string Mnemonic1 = "";
 std::string Mnemonic2 = "";
 std::string Mnemonic3 = "";

 HD_Wallet wallet1(split(Mnemonic1));
 HD_Wallet wallet2(split(Mnemonic2));
 HD_Wallet wallet3(split(Mnemonic3));

 data_chunk p1 = to_chunk(wallet1.childPublicKey(1).point());
 data_chunk p2 = to_chunk(wallet2.childPublicKey(1).point());
 data_chunk p3 = to_chunk(wallet3.childPublicKey(1).point());

Then I can just make the transaction.


 transaction tx = makeTX();
 tx.set_version(1);

And now generate both signatures before building the signature script and adding it to the transaction via the set_script member of the input.


 endorsement sig1 = signature(p1, p2, p3, tx, wallet1);
 endorsement sig2 = signature(p1, p2, p3, tx, wallet2);
 script sigScript = buildSigScript(sig1, sig2, p1, p2, p3);
 tx.inputs()[0].set_script(sigScript);

Now, The transaction is fully formed and signed. We can output a summary of the transaction by accessing the first output’s script and value accessors. After that, we can base16 encode the raw transaction and output it to the user.  This raw transaction can be pushed to testnet via blockcypher or bx.


 std::cout << "\n" <<tx.outputs()[0].script().to_string(0xffffffff) << "||" << tx.outputs()[0].value() << std::endl;
std::cout << encode_base16(tx.to_data(1)) << std::endl;
}

Script can be run as usual:

$ g++ -std=c++11 -o spend multiSpend.cpp $(pkg-config --cflags libbitcoin --libs libbitcoin)
$ ./spend

And here is the output with the raw transaction highlighted.

okay

!

Libbitcoin: Building A Raw Transaction

The Testnet

Building and signing a raw transaction in libbitcoin is relatively easy but can still be prone to costly errors. For this reason, I’ve adapted my previous HD_Wallet class to be formatted as a testnet wallet.

The bitcoin tesnet is basically a development server for the blockchain and bitcoin protocol. It essentially runs as an altcoin with the same rules as bitcoin except that the difficulty is much lower and it is easier to test non-standard transactions on chain. This makes it a great place to practice bitcoin programming without risking any real btc. Tesnet coin’s are essentially valueless and can be obtained for free from several faucets.

In order to change my wallet class to work on the testnet, I will simply need to pass a testnet prefix code to the libbitcoin functions that instantiate the HD master key. Which in my case is in all three of the HD wallet constructors where I will pass the version constant wallet::hd_private::testnet. 


 HD_Wallet()
 {
     entropy = data_chunk(16);
     pseudo_random_fill(entropy);
     mnemonic = wallet::create_mnemonic(entropy);
     seed = to_chunk(wallet::decode_mnemonic(mnemonic));
     privateKey = wallet::hd_private(seed, wallet::hd_private::testnet);
     publicKey = privateKey.to_public();
 }

In addition to passing the version prefix in all three constructors, I will pass the testnet address prefix(0x6f) to the payment_adress constructor that directly creates child key addresses.


 wallet::payment_address childAddress(int index)
 {
     return wallet::payment_address(wallet::ec_public(childPublicKey(index).point()), 0x6f);
 }

The HD wallet is now adapted to work on the testnet.

Getting Testnet Coins

Now, once I’ve generated a new wallet for the testnet, I’ll save the mnemonic and the first child address I want to use. In order to make a transaction, I’ll need some coins to spend, luckily many bitcoin faucets give out free testnet coins. https://testnet.manu.backend.hamburg/faucet and http://tpfaucet.appspot.com/ to name just a couple.

Once I have coins in my wallet, I can use libbitcoin tools to make a raw transaction.

Bitcoin Transactions

Bitcoin transactions are comprised of 2 building blocks, Inputs and an Outputs. Inputs are your unspent coins, where they came from and a script proving they were sent to you. Outputs, are where your coins are going, how many your sending and a script saying how your locking them up.

Each output corresponds to a destination for your bitcoin. they are created from an amount of BTC to spend and a script which locks the output to the receivers keys, generally a P2KH.

Each input corresponds to money you’ve received from a previous transaction and is created from a hash of the transaction that received the coin, the index of the output in it’s source transaction and the script that locks the coin.

Once, Inputs and Outputs are added to a transaction the whole thing is signed by the senders private key and then that signature is added to the redeem script to create the unlocking script which replaces the locking script in the input before the transaction is broadcast to the network.

Raw Transaction Builder(TXB)

Raw Transaction Builder is going to be a command line utility that allows a user to:

  • Import an HD wallet to spend from
  • Enter a Destination and Amount to send
  • Enter a UTXO and index to spend
  • See the corresponding scripts and signatures that make the transaction
  • See the final raw transaction

It will only work for HD wallets and will be assuming the user is constructing a pay to key hash payment.

TX Builder begins by including the necessary library as well as namespacing.


#include <bitcoin/bitcoin.hpp>;
#include "HD_walletTESTNET.cpp"
#include <string.h>;

using namespace bc;
using namespace bc::wallet;
using namespace bc::machine;
using namespace bc::chain;

Then, it uses a get input function to obtain strings from the user.


std::string getInput2()
{
     std::string input; 
     getline(cin, input);
     return input;
}

Now, I can work inside my main function. First, instantiating an HD Wallet from a users inputted mnemonic and child key index. This is the wallet the user will spend from.

int main() 
{
     //import Wallet
     std::cout << "Import Wallet Via Mnemonic: " << std::endl;
     std::string Mnemonic1 = getInput2();
     HD_Wallet wallet1(split(Mnemonic1));
     std::cout << "\nChild Index To Spend From: " << std::endl;
     int child = atoi(getInput(2).c_str());
     data_chunk pubkey1 = to_chunk(wallet1.childPublicKey(child).point());
}

Now, I can construct my output by prompting the user for an address. Once I construct a payment_address object from the string I can pass it’s hash member to a pay to key hash script factory, this creates the output locking script.

     //Make Output//
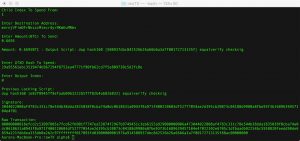
     std::cout << "\nEnter Destination Address: " << std::endl;
     std::string Destination = getInput2();
     payment_address destinationAddy(Destination);
     script outputScript = script().to_pay_key_hash_pattern(destinationAddy.hash());

Next, the Transaction Builder needs to get the amount of bitcoin to spend. Making use of the base10 format function in libbitcoin allows us to take a bitcoin amount from the user and convert it to a satoshi amount, which the output uses. This satoshi amount and the output locking script are passed to an output constructor to create an output argument. TXB then displays this output to the user.


     std::cout << "\nEnter Amount(BTC) To Send: " << std::endl;
     std::string BTC = getInput2();
     uint64_t Satoshis;
     decode_base10(Satoshis, BTC, 8);
     output output1(Satoshis, outputScript);
     std::cout << "\nAmount: " << encode_base10(output1.value(), 8) << "BTC : Output Script: " << output1.script().to_string(0) << "\n" << std::endl;

Now that the output is built, the input is still needed. So, the user will be prompted for a spendable utxo hash and the index of the transaction that the utxo is at. The difference in amount between this utxo and the output is the miner fee. This utxo is then put into an output_point object and used in the input.

 //Get UTXO
 std::cout << "\nEnter UTXO Hash To Spend: " << std::endl;
 std::string hashString = getInput2(); 
 std::cout << "\nEnter Output Index: " << std::endl;
 std::string index = getInput2();
 uint32_t index1 = atoi(index.c_str());
 hash_digest utxoHash; 
 decode_hash(utxoHash, hashString);
 output_point utxo(utxoHash, index1);

Now in order to sign this transaction, the previous locking script is needed. This is the script that was used to pay us, essentially a pay to key hash script to our public key hash. We can recreate it using our public key and a script pattern factory.

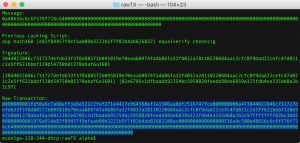
//Previous Locking Script
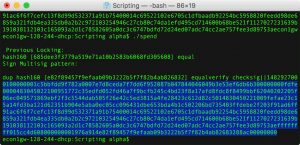
script lockingScript = script().to_pay_key_hash_pattern(bitcoin_short_hash(pubkey1));
std::cout << "\nPrevious Locking Script: " << std::endl;
std::cout << lockingScript.to_string(0) << "\n" << std::endl;

With that we can build our input object using it’s setters, like this:

 //make Input
 input input1 = input();
 input1.set_previous_output(utxo);
 input1.set_sequence(0xffffffff);

Now that we have our input and output created we can construct our transaction. Note here, that transactions can have many inputs and outputs so we are adding our inputs to an input vector member, hence the use of the push_back() method.

 //build TX
 transaction tx = transaction();
 tx.inputs().push_back(input1);
 tx.outputs().push_back(output1);

With all the parts of our transaction done, we can sign the whole thing using our private key and transaction.

//Endorse TX
 endorsement sig; 
 if(lockingScript.create_endorsement(sig, wallet1.childPrivateKey(1).secret(), lockingScript, tx, 0u, all))
 {
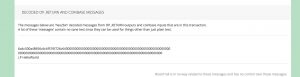
     std::cout << "Signature: " << std::endl;
     std::cout << encode_base16(sig) << "\n" << std::endl; 
 }

Now that we have the signature for this transaction, we can construct the signature script by adding the signature and then the public key to a script. After that we just need to replace the script of our transaction’s first input to our new signature script and output the entire transaction to the user.

 //make Sig Script
 operation::list sigScript; 
 sigScript.push_back(operation(sig));
 sigScript.push_back(operation(pubkey1));
 script unlockingScript(sigScript);

 //Make Signed TX
 tx.inputs()[0].set_script(unlockingScript);
 std::cout << "Raw Transaction: " << std::endl;
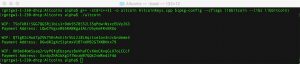
 std::cout << encode_base16(tx.to_data()) << std::endl;

…and compile as usual:


$ g++ -std=c++11 -o ./txBuilder rawTX.cpp HD_WalletTESTNET.cpp $(pkg-config --cflags libbitcoin --libs libbitcoin)
$./rawTX

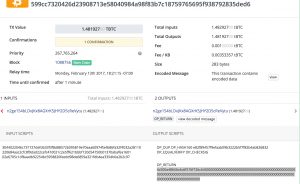
Bam! Great Transaction! Now I just need to send the transaction to the network by broadcasting to a BS. Alternatively, I can copy the raw encoded transaction and paste it into this transaction broadcaster and the transaction will be processed by the miners.

encodedTX


Intoduction to Multisig Scripts

I’ve decided to go through creating a multisig address using libbitcoin both because it’s one of the powerful features of bitcoin and it allows me to see the abstraction libbitcoin uses to manage bitcoin scripting without having to go through an entire transaction.

For this practice script I’m going to be using the HD wallet class I created in my previous tutorial, so go here if you haven’t built that yet or just go here to grab the source code. The one adjustment I’m going to make to the wallet class is adding the functionality to randomly generate a wallet from entropy as an argument-free constructor.


 HD_Wallet()
 {
      entropy = data_chunk(16);
      pseudo_random_fill(entropy);
      mnemonic = wallet::create_mnemonic(entropy);
      seed = to_chunk(wallet::decode_mnemonic(mnemonic));
      privateKey = wallet::hd_private(seed);
      publicKey = privateKey.to_public();
 }

With that addition, I’m going to save the “HD_Wallet.cpp” file and create a new one named “scriptingTest.cpp”. I’ll then need to add my include statements for my wallet class and libbitcoin’s library as well as namespacing the scopes I want to work with, which in this case is going to be “wallet”, “machine” and “chain”.


#include <bitcoin/bitcoin.hpp>
#include "HD_wallet.cpp"


using namespace bc;
using namespace bc::wallet;
using namespace bc::machine;
using namespace bc::chain;

Multiple Signature Addresses

Multisig Addresses take advantage of bitcoin’s scripting language and the concept of pay-to-script hash addresses in order to trustlessly create a conditional account whose funds can only be spent if the conditions are met, in the case of multisig that means reaching a preset threshold of keys present in a transaction.

For example, say you’re managing a team of three researchers and want to give them an expense account for the project but want to make sure that there is at least some discussion and agreement on purchases. You could create a 2 of 3 multisig address that requires at least two of the three keys to be present and sign the transaction in order to spend any money, which means if two out of the three researchers don’t think the purchase is a good idea the purchase won’t happen.

For this utility, I’ll want to create 3 keys and then use them to generate the multisig address I’ll be funding with the proper conditions (2 of 3). I would then need to distribute the corresponding private keys to my researchers for spending.

Multisig Utility

  • Generate 3 sets of Keys
  • Create a 2/3 redeem script
  • Create a pay to script hash locking script
  • Output the resulting multisig address
  • Output three mnemonics for the private keys

In more practical uses the researchers could simply send their own public keys to me in order to generate the address since private keys are not required for the construction of a multsig address.

Multisig Addresses are created by using bitcoin’s specialized scripting language to create a locking script that can only be satisfied by the hash of a signature from a certain number of keys. Their are three parts to a multisig transaction the “redeem script”, this will encode the rules of the address and the hash of this script gets encoded into an address, “the locking script”, this is a special pay to script hash(P2SH) script which includes a hash of the redeem script. The last part is the unlocking script which is the combination of the signatures and the redeem script required to spend money from the address.

The redeem script sets the rules for the address, which in this case is a relatively easy template script:

2 [PUBKEY1] [PUBKEY2] [PUBKEY3] 3 CHECKMULTISIGVERIFY

By making this script into a P2SH address we’re able to get a multisig bitcoin address that can be paid just like any other address.

That means we would double hash the above script using sha256 and then ripemd160 and put that hash in the following script to create what is known as the Locking Script.

HASH160 [20-byte script hash] EQUAL

The 20-byte has of the original MultiSig script would then be base58-check encoded to a bitcoin address.

358vPZP3zaBpNMatFgRBxX58ftUbqDreMN

All multisig Addresses start with a 3.

The Code

Okay, so now that we have the concept down let’s dive into some code. Since this utility is just a script, I’m going to put the whole thing in the main function. To start I’ll need to generate 3 HD wallets using the empty constructor I just added. From there, I’ll need to derive a child key from each of them and save the compressed public key as a data chunk.


 HD_Wallet wallet1 = HD_Wallet();
 HD_Wallet wallet2 = HD_Wallet();
 HD_Wallet wallet3 = HD_Wallet();

 data_chunk pubkey1 = to_chunk(wallet1.childPublicKey(1).point());
 data_chunk pubkey2 = to_chunk(wallet2.childPublicKey(1).point());
 data_chunk pubkey3 = to_chunk(wallet3.childPublicKey(1).point());

Scripting

Bitcoin has it’s own scripting language consisting of various op_codes used to program transactions. The libbitcoin framework has three basic structures for scripting. The first is a c++ enum class of all the opcodes allowing us to pass opcodes to a constructor and return the operation. The next is an operation object to hold all the members and routines of an operation. One level higher is the script object which takes a bunch of operations and accesses all the serialization and validation routines for the entire script.

So, to build our script we are going to take advantage of a special operation type list which is a vector of operations. First we pass the opcode to the opcode enum class and pass that opcode to an operation object which we in turn are passing to our operation vector(list).

We’re passing the code ’82’ first which corresponds to push positive 2, our scripts first argument. Then we pass The three public keys. After doing that for all 3 public keys we pass the codes for 3 and checkmultisigverfy.

After we have the whole operation list we pass the vector to a script constuctor.


operation::list opList {operation(opcode(82)), operation(pubkey1), operation(pubkey2), operation(pubkey3), operation(opcode(83)), operation(opcode(174))};
script multisigScript(opList);
if(script().is_pay_multsig_pattern(opList)
{
     std::cout << "Is Multisig Pattern!" << std::endl;
}

We can then check the validity of our script before we output it to the console both as a string and in hex.


 if(multisigScript.is_valid())
 {
     std::cout << "Script is Valid!\n" << std::endl;
 }else{
     std::cout << "Script Invalid! \n" << std::endl;
 }

 std::cout << "Redeeem Script: \n" << std::endl;
 std::cout << multisigScript.to_string(0) << "\n" &lt;&lt; std::endl;
 std::cout << encode_base16(multisigScript.to_data(0)) << "\n" << std::endl;

Now, we can use the libbitcoin function “bitcoin_short_hash” to invoke the hash ripemd160(sha256(script)). Then using a special factory member of the script object we can pass the hash into a template stack for a pay to script hash type transaction.

short_hash scriptHash = bitcoin_short_hash(multisigScript.to_data(0));
script pay2ScriptHash = script(multisigScript.to_pay_script_hash_pattern(scriptHash));

After that we have created a P2SH script which allows us to view the locking script. The original MultiSig script can then be hashed and encoded as an address whose balance will only be spendable if the underlying multsig script is satisfied. We can pass the libbitcoin payment_address() either the redeem scripts hash or the script object itself and retrieve the multisig address.


 std::cout << "Locking Script: " << std::endl;
 std::cout << pay2ScriptHash.to_string(0) << "\n" << std::endl;

 payment_address multsigAddress(multisigScript);
 std::cout << "Payment Address: " << std::endl;
 std::cout << multsigAddress.encoded() << "\n" << std::endl;
 std::cout << payment_address(scriptHash).encoded() << "\n" << std::endl;

Once the address is funded, I can distribute to my researchers the three mnemonic seeds whose first child key corresponds to this address.


 std::cout << "Private Key Mnemonics: \n" << std::endl;
 std::cout << "Key One: " << wallet1.displayMnemonic() << std::endl;
 std::cout << "Key Two: " << wallet2.displayMnemonic() << std::endl;
 std::cout << "Key Three: " << wallet3.displayMnemonic() << "\n" << std::endl; 

Now, this script can be compiled an run as usual and the result should look something like usual.

Funds sent to this address can only be spent in a transaction that includes the unlocking script consisting of at least 2 of the private keys signatures and the redeem script. My next post will go over creating a transaction from this multisig address.

As always sample code is on Github.